TeamSpeak 3 Setup
Installation Guide for use with the BFSG Server
Contents
Before you start
Please, please, PLEASE read this document through before starting, and then read it again, and only when you’ve done that, consider following any of the instructions that appear below.
If you already have TeamSpeak 3 installed on your PC…
Then skip to the Configuration for Existing TS3 Users section of this document.
Installation and Setup for new TeamSpeak 3 users.
So – you’re a TS3 newbie. Don’t worry – the only difference is downloading and installing the software, and the sections below will make that as simple as possible.
Download
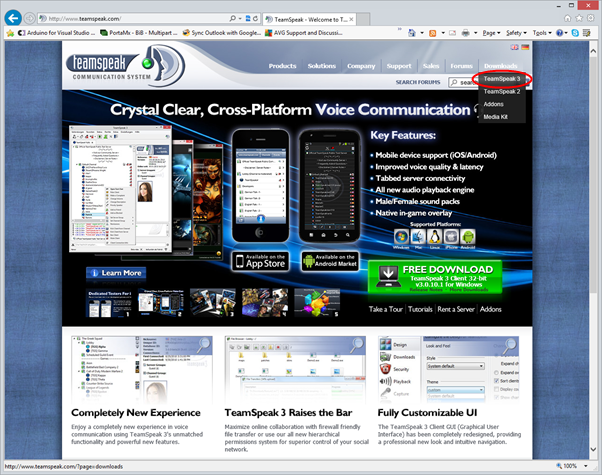
Firstly, you will need to download the appropriate client for your system. In your browser, navigate to http://www.teamspeak.com. At the time of writing, the website looked a bit like the screenshot in figure 1 below, but it may have moved on since then. With your mouse, hover over “Downloads” at the top right and select “TeamSpeak 3”.
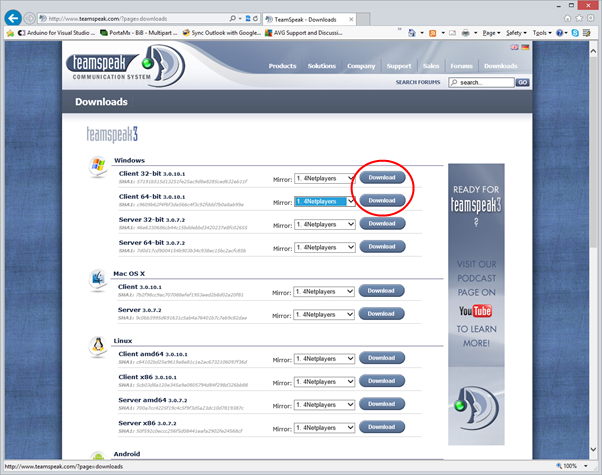
From the page that appears (which should look like the screenshot in figure 2 below), download and save the 32-bit or the 64-bit client to match the version of Windows that you’re running. If you’re not sure which version you’re running, take a look at the Am I running 32-bit or 64-bit Windows? article!
Don’t get too hung up on the version numbers in the screenshot – they’re bound to have moved on since the screen shot was taken and since this document was written – you’re always going to download the latest version and following installation TS3 will always let you know if there’s a newer version available when you start it. A few hoops need to be jumped through before the download can commence – you need to accept terms and conditions, and optionally help with a quick one question survey.
Installation
Run the program you’ve just downloaded.
- Allow the program to make changes to your computer if asked.
- At the “Welcome” screen, click “Next”.
- At the licence agreement, click “I agree”.
Unless you don’t, but that’s not going to help you install anything. - Choose the users according to your own preference if asked and click “Next”
- Choose your destination folder.
This is where it gets a bit funny. For some reason, if you choose to install for “just me”, the installer puts the program in a hidden folder in your user account. Personally, I don’t like that – so I changed it to “C:\Program Files\TeamSpeak 3 Client” which is the default for the “Install for all users” option. Now, in my case, I have multiple users set up on my PC for my family – you may not and all this may be superfluous! Whatever you choose / see, check that it’s correct again before you click “Next” to move on. - Choose to store the configuration in “user own files” and click “Next”.
(I haven’t tried the option to store in the program directory, but that looks as if it’s likely to play up on versions of Windows later than XP!) - Whether you wish to install “Overwolf” is up to you.
Overwolf claims to provide an overlay showing TS information in the screen of the game you’re playing. The quick play I had with it wasn’t particularly successful with FS! It showed me who was in the room I was connected to OK, and highlighted who was speaking, but there were issued around focus and the keyboard. Either way, it’s easy enough to remove if you try it and don’t get on with it. - Choose an appropriate “Start Menu Folder” – the default is fine for me, and click “Install”.
Installation takes seconds! - In the final dialog that appears, deselect the “Launch” option, and click “Finish”.
We’ll start TS3 up a different way shortly.
Configuration
At this point, you should be able to click on the link on the (new) TS3 display on the BFSG website to connect. So go ahead! After a few moments, you’ll see the main dialog and a “Setup Wizard” window on top.
- Click “Next” to start the set up.
- Choose a nickname – this is for display purposes only – and click “Next”
- Choose “Push-To-Talk”, then click on “No Hotkey Assigned” and press your favourite PTT key. Click on “Next” Different people have different preferences, but most people choose a key which doesn’t do anything if pressed on its own – such as “SHIFT”, “CTRL” or “ALT”.
- You’re then given the opportunity to do a microphone test. Press your newly selected PTT key and talk. If all is well, you’ll hear your own voice. If not, check your audio connections and settings and try again, but if that doesn’t work carry on and we’ll look at how to fix things later on. Either way, click “Next”
- Set up a speaker mute key if you want one. Click next when you’re done.
- Choose the sound pack for those annoying messages and click next. There is an option to choose a sound pack with no voices – it’s called “Sounds deactivated”. If you’re only going to use TS3 on the BFSG server then you can choose this one, otherwise you can specify on a per server basis later on.
- On the “All Done!” screen, you should select “Open bookmarks” and deselect “Open public server list” and “Rent your own TeamSpeak server” before you click “Finish” – all of the options exactly the opposite to their default values.
Now, if your audio test was successful, jump to the “Common Configuration” section of this document otherwise, keep reading.
Fixing Audio Problems
This is the biggest cause of problems with any TS installation – probably with TS1, with TS2 or TS3 for sure, and no doubt TS4 when it comes along in a few years!
First of all if there are any other programs running at the same time which might be using audio, then they would probably be best shut down. Don’t worry if there’s nothing – it can happen though. Once you’ve done that, start the Setup Wizard in TS3 again from the “Tools”, “Setup Wizard” menu and see if that works. If it does then skip to the “Common Configuration” section on page 5 of this document otherwise, keep reading.
The next bit assumes that you’re already up and able to communicate on TS2 – if you’re not, the principles will be similar, but will include more of an element or trial and error as you need to skip the next paragraph and manipulate settings from a position of less knowledge!
So… fire up TS2, open up the “Options” dialog from the “Tools” menu again, and let’s look a bit more closely at the settings. First of all, take note of what’s set up in the Sound Driver section in the top left group box – it’s either “Wave” or “Direct Sound”, then take a look at what’s set as the “Input Device” in the bottom left. Most people will have a default of “Primary Sound Capture Driver”, but some have a specific input device selected.
OK – now fire up TS3. If it tries to take you through the Setup Wizard (which I don’t think it will), just complete it but ignore the sound test for now. Open up the “Options” dialog from the “Tools” menu and navigate to the “Capture” screen. In the top – where it says “Capture Mode”, choose “Direct Sound” if you noted “Direct Sound” from TS2 or “Windows Audio Session” if you noted “Wave”. Then make sure that the capture device is the same as the one selected in TS2 using “Default” if you noted “Primary Sound Capture Driver” above.
If you weren’t running TS2, then try one, then the other of the “Capture Mode” options, and look for a “Capture Device” which looks right.
Once you made the changes you want to try, click on “Apply”, then try clicking on the “Begin Test” test and things should be OK. If not, change the settings that you’ve changed in here only – one at a time – click “Apply” and try the test again. If you still can’t get it to work, post a message with pictures if possible, or a detailed description of what’s happening in the “Help” section of the forum, and someone will be along to help.
Configuration for Existing TS3 Users
Identities
In case you’re not already aware, TS3 doesn’t use the concept of usernames and passwords. Instead, it allows a user to maintain one or more identities which identify them to any server they connect to. All TS3 servers maintain a list of authorised identities and the permissions that are available to them.
If you already use TS3 you will already have an identity defined. It’s OK to use that identity on more than one server if you wish.
If you want to keep things separate though, you can create a new one by completing the following steps.
- Start TS3, but don’t connect to anything.
- From the “Tools” menu, select “Identities”
- Click on “Add”
- Type a name for the identity – “BFSG” works!
- Type a nickname to be associated with the identity. The nickname is the name that appears to you and other users in the TS3 window when you connect to the server.
- Click OK.
Now, we’re going to create a Bookmark for the BFSG server, so
- From the “Bookmarks” menu, choose the “Manage Bookmarks” option.
Carry on now with the steps contained within the Common Configuration section which follows.
Common Configuration
The following sections describe configuration that is common to both new and existing TS3 users. If you’ve followed the instructions above, you’ll be in the right place to continue setting up from the start of the “Bookmark” section that follows.
Bookmarks
Bookmarks allow you to set up different configurations of TS3 for use with different servers, or different configurations for use on the same server. Now though, we’re not too worried about those possibilities and will simply create a single bookmark for use with the BFSG server. This bookmark will be used up automatically the next time you click on the “Connect with nickname…” link on the website.
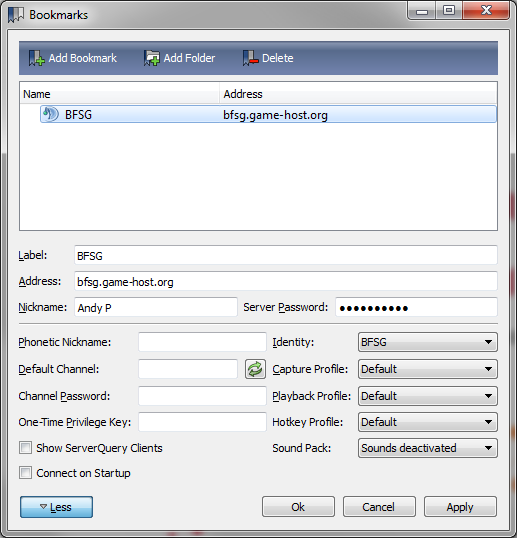
You should (if you’ve been following the instructions) now be presented with a “Bookmarks” window that looks similar to Figure 3 below, but may not have all of the options at the bottom,: -
- Click on “Add Bookmark”
- Change the label to “BFSG”
Or anything else you want really…! - Change the address to “bfsg.game-host.org”
- Check your nickname is what you’re expecting.
This is the default that will be used if you connect from the program. If you connect by clicking on the link on the website, you’ll get the nickname which the website says it’s going to use. Whatever appears, you should be able to change it once you’re connected if you wish. - Type “BristolFSG” into the “Server Password” box (no quotes), and click “OK”.
This is important – you won’t be able to connect to the server without it. - If you see the word “More” on a button on the bottom left, click that button!
You’ll then get all of the options that are in figure 4. - Select the identity you want to use with the BFSG.
If you’ve just installed TS3, then you should just accept the “Default” option. If you had TS3 installed already AND you just created a new identity, then this is the place to select it. - Choose the sound pack that you want to use with the server.
If you’re planning to join the weekly fly-ins, then you should choose “Sounds deactivated”.
If you’ve just installed TS3, you should now find yourself connected to the server and placed in the lobby. In the pane on the right hand side, you’ll see that you’re in the “Guest” server and channel groups.
One-time Privilege Keys
One of the limitations of TeamSpeak 2 is that it is only possible to confer certain rights on a user when both they and a suitable admin are connected to the server at the same time. This limitation goes away in TS3.
If you’re performing a specific role that requires elevated privileges (and that really means you’re either a group lead, or a planner for a group which means you need to edit rooms on the server), then you’ll receive a PM on the forum with a Privilege key in it. As the name suggests, these keys can only be used once.
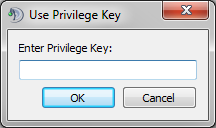
If you have receive one of these keys, then from the “Permissions” menu choose the “Use Privilege Key” option and you should see the dialog that appears in figure 4 below. Copy and paste the key into the text box – ensuring that you don’t pick up spaces on either end – and press OK.
You should then be able to do everything that the new privileges let you! You’ll receive instruction from someone who knows!


